Title
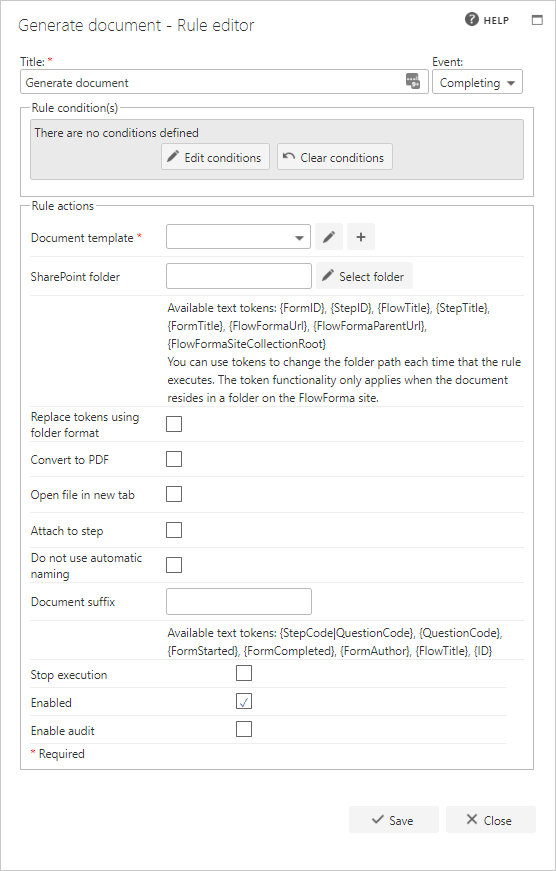
The first part of the business rule lets you define a title for your rule and select the event on which it operates. The default title is the standard FlowForma rule name; change it by deleting the text and entering your own. In the event field you determine when the rule is executed. For a flow this can occur when the form is loaded, started, or completed. For a step this can occur when the step is started, saved, or completed. For questions it can occur when the question is updated.Rule condition(s)
The second part of the business rule lets you set conditions. These are not required, but if entered they control when the rule is executed in relation to other items in the form.Rule actions
- Build template using: a drop-down to select the template engine used to build the document, Word Plugin (classic) or Word Add-in (modern).
- Select output question: assign the generated document to a question in the flow.
- Document template: contains a drop-down list of all the document templates attached to the current flow. To attach a document to a flow, you have to edit the properties of the document in the “document templates” library and select the flow.
- You can add and edit a new document template using this rule.
- To add a new document, click the + icon beside the pencil as highlighted below. Enter the title of the new document, then click the check icon to create the new template. Then click the pencil icon beside the template name to open the new template and edit it. The new template will be available to view in Document Templates. Once you are finished editing, save the document.
- You can also edit existing document templates associated with the flow you are working on from the Generate document rule:
- Select the document template from the drop-down menu under rule actions. Click the pencil icon beside the template name to open the template, then edit the text and tokens. Click save to save your edits.
- SharePoint folder: by default, the newly created document is saved in the form folder in the “form documents” library. This field gives you the option to define a different SharePoint folder for saving documents.
Available tokens
The Available Tokens let you specify a folder structure, including sub-folders, for storing documents. By default, the Form Documents library is used, and generated documents are placed into a sub-folder for each Form Title. However, you may wish to create a sub-folder in the Form Documents library for each flow, so that when you go to the Form Documents library you see a folder for each flow (provided a document generation rule has executed and created that folder). You can create further sub-folders using, for example, the Step Title token, so when you go to the Form Documents library, you open the relevant Flow Title folder, then the relevant Step Title folder, and all documents generated by that step, in that flow, are stored there. Available tokens for the SharePoint folder path:{FormID}, {StepID}, {FlowTitle}, {StepTitle}, {FormTitle}, {FlowFormaUrl}, {FlowFormaParentUrl}, {FlowFormaSiteCollectionRoot}.
A few examples:
Subfolder for Flow Title - https://sitename.com/sites/FlowFormaSite/FormDocuments/{FlowTitle}
Subfolder for Step Title - https://sitename.com/sites/FlowFormaSite/FormDocuments/{StepTitle}
Subfolder for both Flow Title, and Step Title - https://sitename.com/sites/FlowFormaSite/FormDocuments/{FlowTitle}/{StepTitle}
- Replace tokens using folder format: certain characters are normally replaced with underscores when tokens are replaced; this option prevents that from happening.
- Convert to PDF: if this option is not checked, the document is created in Microsoft Word. If you check this option, the document is created as a PDF.
- Convert to text: creates the document as a text-based document.
- Insert the file extension: specify the file extension to use for the generated document. It must start with a period, for example
.txt. - Open file in new tab: if checked, the generated document opens in a new browser tab.
- Attach to step: if you want to be able to access the newly created document directly from the form, without having to go to the SharePoint library where the document was saved, check this box. To use this option, you have to check the “enable attachments” option at the step definition level. A link to the document is included on the form.
- Do not use automatic naming: by default, the name of the created document is “form+form ID”. The form ID is a number incremented from 1 each time a new form is created. You can decide not to name documents this way, and instead define a new name using the document suffix.
- Document suffix: if you specify a suffix, it is added after the form ID. The new name of the document will be “form+formID+suffix”, unless “do not use automatic naming” is enabled, in which case the document name will only be what is entered as the suffix.
It supports the following tokens:
- StepCode|QuestionCode: will return the value of a question. If a question is reused on multiple steps, you can enter the step code to specify which step to take the value from, along with the question’s question code.
- QuestionCode: will return the value of a question
- FormStarted: will return the date & time the form was started
- FormCompleted: will return the date & time the form was completed
- FormAuthor: will return the name of the person who created the form
- FlowTitle: will return the title of the flow the form was generated using
- ID: will return the ID of the form
- Stop execution: if stop execution is enabled and this rule is executed, no other rules are executed.
- Enabled: rules aren’t saved to a list like questions and steps are, so if you want to stop a rule executing without deleting it, toggle this option to enable or disable the rule.
- Enable audit: if checked, a record is added to the audit trail when this rule is executed. This option is available when the Compliance feature pack is activated.
Document generation on form completedIf you generate the document on the form completed event and you want the generated document sent as an attachment to an email, you have to define the folder where the document will be saved. By default, when the rule is executed on form completed, the generated document is saved in the last active step’s folder. If the last step of the form isn’t always the same, make sure you know exactly where the document is saved so that you can select the correct URL when sending the email.
Securing PDFs
When generating a document that you plan to convert to a PDF file, you can also add password protection to the PDF, and manage the permissions applied to it. Checking the box for Convert to PDF shows a PDF security option. Leave this unchecked if you don’t want to password-protect the document. If you check the box for PDF security, additional options appear for you to configure.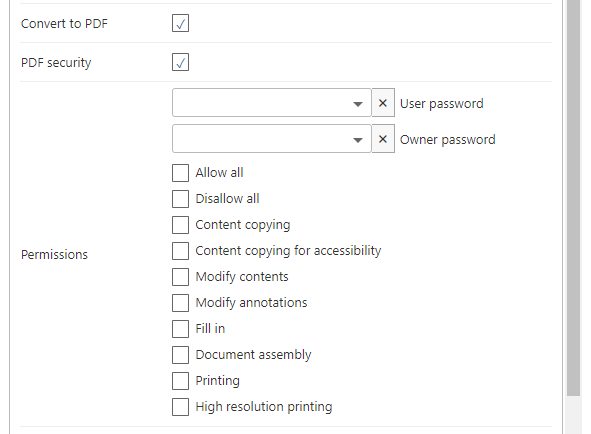
Setting passwords
There are two passwords you can set:- User password: if the PDF is opened using the user password, the selected permissions are applied to the document.
- Owner password: if the PDF is opened using the owner password, the “Allow all” permission is applied to the document.
- Questions: set the password by selecting a question in the form using the dropdown; the value contained in that question is applied as the password.
- Freetext: you can also set a password by typing into the answer field. When you save the rule editor dialogue, the password is encrypted, and the encrypted value, not the password, is displayed when you reopen it.
Permissions
There are several different permissions that can be applied to the PDF:- Allow all: allows all operations on the PDF document.
- Disallow all: disallows all operations on the PDF document. This is the default value.
- Content copying: allows copying or otherwise extracting text and graphics from the document, including extraction for accessibility purposes.
- Content copying for accessibility: allows extracting text and graphics in support of accessibility for disabled users or for other purposes.
- Modify contents: allows modifying the document’s contents.
- Modify annotations: allows adding or modifying text annotations.
- Fill in: allows filling in forms and signing the document.
- Document assembly: allows assembling the document: inserting, rotating, or deleting pages, and creating navigation elements such as bookmarks or thumbnail images.
- Printing: allows printing the document.