- Open the Flow Designer by clicking the flow title on the flows list
- When the Flow Designer opens, click the Designer tab
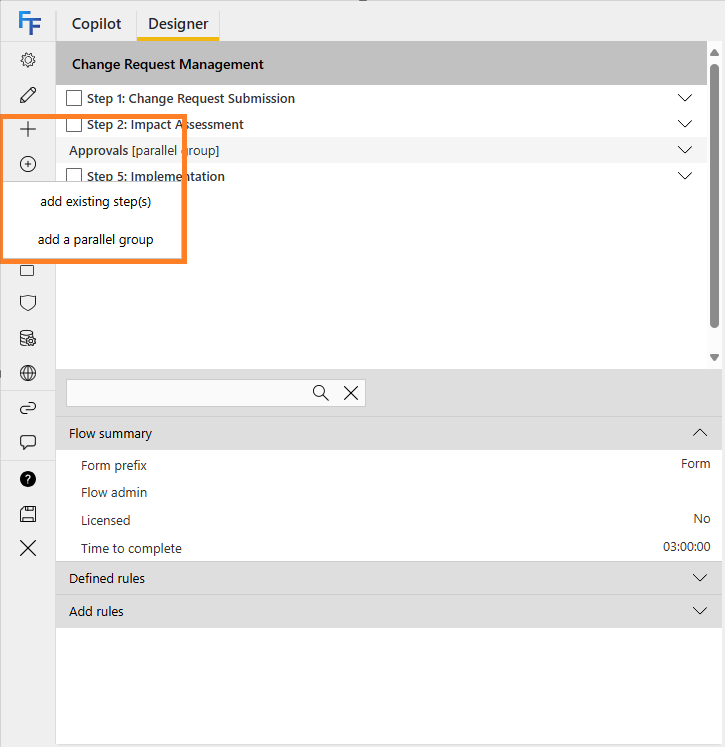
- The flow level is selected by default, allowing you to click the + icon to add a new step
- You can also use the circled + icon to display additional options, such as:
- Add existing step(s): opens the add existing step picker dialog
- Add a parallel group: opens the add parallel group dialog
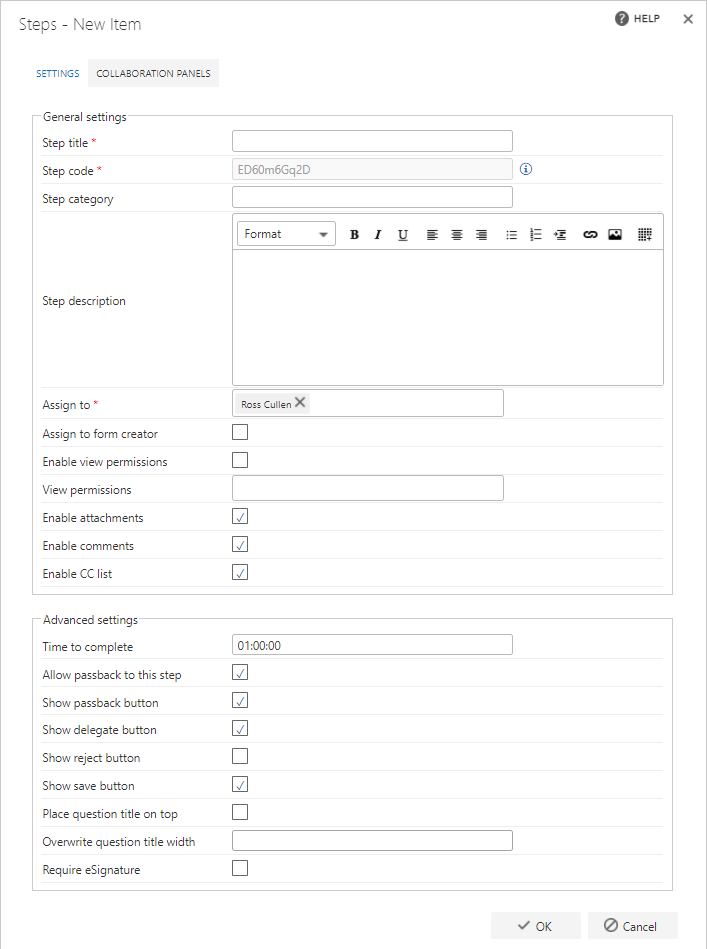
General settings
Step title: each step must have a title. This is the text that appears on the tile for the step when a form is running. It also appears in the Flow designer and on the steps list accessed from the quick launch panel Step code: each step must have a unique code. One is generated by default when you start creating a new step, but you can overwrite this and enter your own code if you prefer. The step code won’t appear on the form, but you can use it to search and filter when adding steps Step category: you can categorise steps to make it easier to identify which steps belong to a specific flow. If you enter a category name that’s already in use, the step is added to that category. Otherwise a new category is created. If you leave it blank, the step is uncategorised Step description: you can enter a description of the step for further clarification. When a form is created, this description is displayed at the foot of the step, so it can be used to show information relating to the step. When you enter the step description, a formatting panel appears at the top of the screen, which you can use to control the format of the text as it’s presented to the user in the form Assign to: you can assign an individual or a group to a step. Those assigned to a step are able to complete, reject, or approve the step Assign to form creator: rather than specifying who the step is assigned to, you can assign it to the person who initiates (creates) the form Enable view permissions: if you check this option, view permissions are enabled View permissions: specify the users or groups you want to grant view permission to. Only users or groups that already exist can be selected. Once you start typing, suggested names appear. Only these users/groups can view the information entered in this step Enable copy from: if you check this option, users can copy data from the same step in a previous form, rather than having to enter the information again Enable attachments: check this option to include an attachments section in the step. This is a section at the foot of the step where you can attach documents Enable comments: check this option to include a comments section in the step. This is a section at the foot of the form where you can enter comments if required Enable CC list: check this option to include a CC list section in the step. This section allows you to enter users/groups or email addresses to be added to the CC list of automated emails when the step is submittedAdvanced settings
Time to complete: used to denote the expected time a form should be active on the step, used for Process Performance, specifically for Step Analysis. It only flags the process as delayed; it does not trigger any actions if it passes this time to complete Allow passback to this step: when performing passbacks, if left checked the form can be passed back to this step. If unchecked, this step won’t be displayed as an option to pass back to Show passback button: if left checked, the passback button is shown on this step. If unchecked, the passback button is not available for use on this step.The passback rule can still be used even if the passback button is not being shown.