To install the Modern SharePoint version of FlowForma you can follow the instructions below for first time installation.
Note: You can only have either the Legacy FlowForma Add-In or the Modern SharePoint version of FlowForma installed on the same site. If the Add-In is installed and contains forms and flows, these will need to be migrated to the Modern SharePoint FlowForma.
- Navigate to the subsite you want to install FlowForma 8 to
- Open “Site Contents”
- Using the “New” dropdown menu, click “App”

- On the “My apps” page, go to “From SharePoint Store”
- Then click on “Find more apps in the SharePoint Store”


-
Click on the tile for the FlowForma Digital Process Automation app
-
Then click “Add to Apps site”, and confirm data access by clicking “Add”

-
The app package for “FlowForma” will be added to the Tenants App Catalog

-
You can now click Add again, to install it to the subsite

-
Go back to the “Site Contents” page and refresh, the installation dialogue will appear for FlowForma Installation
 Replace site navigation with FlowForma navigation: you can replace the current left hand side navigation so all links will appear in the menu, leaving this option unchecked will create a heading link named “FlowForma” containing all the links
Add sample Flows to FlowForma: Before installing the app, you can choose to install the sample flows, so you have something to view straight away after installation
You can choose to not include this and have a clean installation if they’re not required
To continue with the installation you will need to grant the app some permissions:
Application permission: you need to sign in with a Global Adminstrator to grant the app permissions
This is only required during the first installation of the app, additional installations will not require app consent again
Replace site navigation with FlowForma navigation: you can replace the current left hand side navigation so all links will appear in the menu, leaving this option unchecked will create a heading link named “FlowForma” containing all the links
Add sample Flows to FlowForma: Before installing the app, you can choose to install the sample flows, so you have something to view straight away after installation
You can choose to not include this and have a clean installation if they’re not required
To continue with the installation you will need to grant the app some permissions:
Application permission: you need to sign in with a Global Adminstrator to grant the app permissions
This is only required during the first installation of the app, additional installations will not require app consent again
 User permission: after the app permissions are granted, you can then grant user permissions
It is important to ensure that “Consent on behalf of your organisation” is checked.
User permission: after the app permissions are granted, you can then grant user permissions
It is important to ensure that “Consent on behalf of your organisation” is checked.
 Granting both the App & User permissions, creates a new “Enterprise Application” in your tenants Entra ID, this provides the FlowForma Application the necessary permissions required for it to operate.
Install FlowForma: once the app and user permissions are granted, you can then click “Install FlowForma”
Granting both the App & User permissions, creates a new “Enterprise Application” in your tenants Entra ID, this provides the FlowForma Application the necessary permissions required for it to operate.
Install FlowForma: once the app and user permissions are granted, you can then click “Install FlowForma”
 Once the app is finished installing, you will see the left hand side navigation is updated with new links to navigate the FlowForma app, to create processes, create new forms etc
If you choose to replace navigational links, they will appear like:
Once the app is finished installing, you will see the left hand side navigation is updated with new links to navigate the FlowForma app, to create processes, create new forms etc
If you choose to replace navigational links, they will appear like:
 If you choose not to replace navigational links, they will appear in a heading link like so:
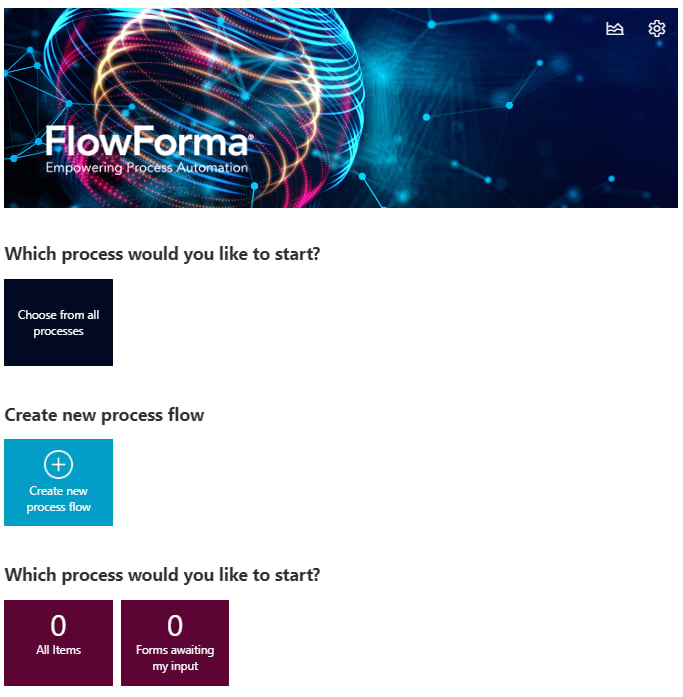
 Regardless of installing the app replacing the navigation links, the dashboard will be added.
However, if you do not replace the links, it will be accessible via the “Dashboard” link,
Replacing the navigation links, will replace the default “Home” page, with the “FlowForma Dashboard” page.
Additionally, if required, you can install the dashboard on additional pages by adding the dashboards webpart.
To add the FlowForma Dashboard,
Regardless of installing the app replacing the navigation links, the dashboard will be added.
However, if you do not replace the links, it will be accessible via the “Dashboard” link,
Replacing the navigation links, will replace the default “Home” page, with the “FlowForma Dashboard” page.
Additionally, if required, you can install the dashboard on additional pages by adding the dashboards webpart.
To add the FlowForma Dashboard,
- Edit the site page
- Add a new webpart
- Searching for “FlowForma Dashboard”

- Add the webpart, and republish the page