> ## Documentation Index
> Fetch the complete documentation index at: https://docs.flowforma.com/llms.txt
> Use this file to discover all available pages before exploring further.
# User management
> Provision FlowForma users through Microsoft Entra ID and manage SharePoint groups, permissions, site collection administrators, and access levels.
## Creating users
FlowForma is integrated as a modern application within Microsoft 365, using the SharePoint Framework (SPFx) for seamless interaction with SharePoint. User management is done through Microsoft Entra ID (formerly Azure AD), keeping user access consistent with your organization's Microsoft 365 account.
To provision users:
1. Create users in Entra ID as you would for your Microsoft 365 environment.
2. Add these users to a SharePoint group associated with the FlowForma solution for access and permissions.
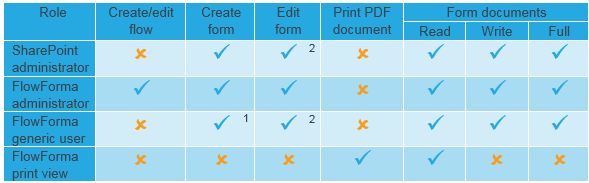 1. Only possible if you have given the FlowForma generic user read permission on the flow associated with this form.
2. Only possible if the user is assigned to the form.
## Creating and managing groups in SharePoint
When creating groups in SharePoint, keep the following considerations in mind:
1. **Group Ownership**
Determine who will own the group. Any Active Directory user can be assigned as a group owner.
2. **Membership Management**
Decide who will manage group membership. This responsibility can be assigned to either the group owner or a group member.
3. **Permissions and Modifications**
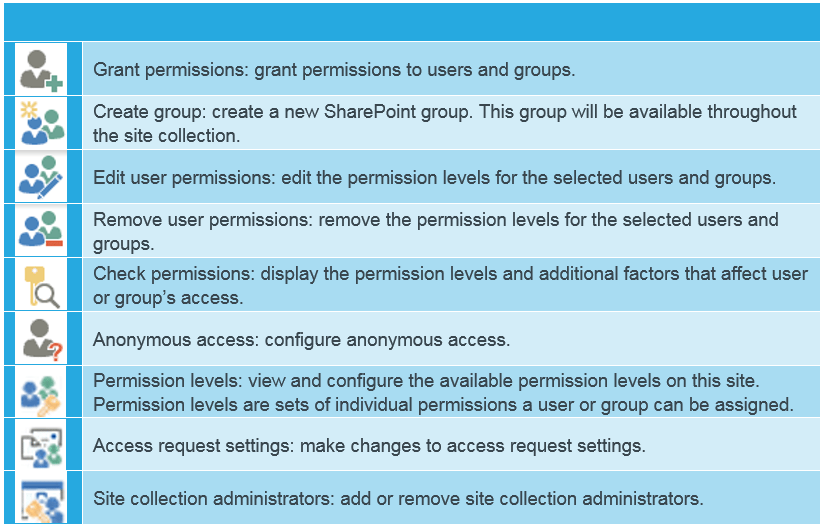
* SharePoint site collection administrators and site administrators can modify any group's permissions and membership by default.
* Group owners and members may also manage group membership if allowed in the group settings. However, if they lack site collection or site administrator rights, they must use the group link directly to make changes.
4. **Group Creation Location**
* Groups are typically created at the site collection level, as it serves as the root for site permissions.
* Alternatively, you can create groups for specific sub-sites and manage their membership at that level.
1. Only possible if you have given the FlowForma generic user read permission on the flow associated with this form.
2. Only possible if the user is assigned to the form.
## Creating and managing groups in SharePoint
When creating groups in SharePoint, keep the following considerations in mind:
1. **Group Ownership**
Determine who will own the group. Any Active Directory user can be assigned as a group owner.
2. **Membership Management**
Decide who will manage group membership. This responsibility can be assigned to either the group owner or a group member.
3. **Permissions and Modifications**
* SharePoint site collection administrators and site administrators can modify any group's permissions and membership by default.
* Group owners and members may also manage group membership if allowed in the group settings. However, if they lack site collection or site administrator rights, they must use the group link directly to make changes.
4. **Group Creation Location**
* Groups are typically created at the site collection level, as it serves as the root for site permissions.
* Alternatively, you can create groups for specific sub-sites and manage their membership at that level.
 ## Permissions
 ## Create a group
1. **Access the Site Settings**
* Navigate to the SharePoint site where you want to create the group.
* Click the gear icon (⚙️) in the top-right corner and select **[Site settings](/product/the-flowforma-site/site-settings/overview)**.
* If you don't see this option, ensure you have sufficient permissions (site administrator or higher).
2. **Locate the Group Management Page**
* Under Users and Permissions, click Site permissions.
* On the Site Permissions page, click Create Group in the ribbon or on the menu bar.
3. **Set Group Details**
* Name: Enter a name for your group.
* Description: Optionally, provide a brief description of the group's purpose.
4. **Assign Group Ownership**
* Under Group Owner, assign an owner for the group by selecting a user from the directory. This user will have the ability to manage the group.
5. **Configure Group Permissions**
* Choose the group's permission levels, such as Full Control, Contribute, or Read.
* You can create a custom permission level if needed (under Permission Levels in the Site Settings).
6. **Membership Requests (Optional)**
* Decide whether to allow users to request to join or leave the group.
* Configure the settings for auto-approval or manual approval by the group owner.
7. **Add Members to the Group**
* After creating the group, go back to Site permissions and click on the group name.
* Click New (or Add Members) to add users or groups to the new SharePoint group.
8. **Save and Verify**
* Click Create to finalize the group creation.
* Verify the group appears in the Site permissions page and test the permissions if necessary.
Your group is now ready to use! Members added will inherit the permissions associated with the group.
If you want to send emails to a group, set "Everyone" for "Who can view the membership of the group?"
## Remove users from a group
* **Navigate to the Site**
* Go to the SharePoint site where the group is located.
* **Access Site Permissions**
* Click the gear icon (⚙️) in the top-right corner and select Site permissions (or Advanced permissions settings depending on your SharePoint version).
* **Open the Group**
* In the Site Permissions page, locate the group from which you want to remove a user.
* Click the group name to view its membership.
* **Edit Membership**
* On the group's membership page, look for the Settings or Actions menu.
* Select Edit Users or locate the list of members directly.
* **Remove the User**
* Find the user you want to remove from the list of members.
* Select the checkbox next to their name (if applicable), then click Remove Users from Group (or a similar option).
* **Confirm Removal**
* Confirm the action when prompted. The user will be removed from the group.
* **Verify Changes**
* Ensure the user no longer appears in the group membership list.
* Test the user's permissions if necessary to confirm they no longer have access tied to the group.
## Grant site access to a group
* **Navigate to the Site**
* Open the SharePoint site where you want to grant access to a group.
* **Open Site Permissions**
* Click the gear icon (⚙️) in the top-right corner.
* Select Site permissions
* **Grant Permissions**
* On the Site permissions page, click the Grant Permissions button.
* In Advanced permissions settings, you may see an Invite People or Grant Permissions link.
* **Enter the Group Name**
* In the Share or Grant Permissions dialog box, type the name of the SharePoint group you want to give access to.
* Ensure the correct group is selected from the suggestions.
* **Assign Permissions**
* Choose the appropriate permission level for the group, such as Read, Contribute, or Full Control.
* Confirm the level aligns with the group's intended role.
* **Send Notification (Optional)**
* If applicable, choose whether to send an email notification to the group members about the granted access.
* You can include a custom message if needed.
* **Save and Verify**
* Click Share or OK to apply the changes.
* Confirm the group appears in the Site permissions list with the assigned permission level.
## Delete a group
* **Navigate to the Site**
* Go to the SharePoint Online site where the group is located.
* **Access Site Permissions**
* Click the gear icon (⚙️) in the top-right corner.
* Select Site permissions from the dropdown.
* **Open Advanced Permissions**
* In the Site permissions panel, click Advanced permissions settings at the bottom.
* This will open the classic permissions management page.
* **Locate the Group**
* On the advanced permissions page, find the group you want to delete in the list of groups.
* Click the group name to open its settings.
* **Open Group Settings**
* On the group's page, click Settings (located at the top of the page).
* Select Group Settings from the dropdown menu.
* **Delete the Group**
* Scroll to the bottom of the Group Settings page.
* Click Delete and confirm the action when prompted.
* **Verify Deletion**
* Return to the Advanced permissions settings page and confirm the group no longer appears in the list.
## Assign a new permission level to a group
* **Navigate to the Site**
* Go to the SharePoint Online site where the group is located.
* **Access Site Permissions**
* Click the gear icon (⚙️) in the top-right corner.
* Select Site permissions from the dropdown.
* **Open Advanced Permissions**
* In the Site permissions panel, click Advanced permissions settings at the bottom.
* This will open the classic permissions management page.
* **Create or Verify a Custom Permission Level**
* On the advanced permissions page, click Permission Levels at the top.
* If the required custom permission level doesn't exist, click Add a Permission Level.
* Provide a name and description, select the desired permissions, and click Create.
* **Assign the Custom Permission Level to a Group**
* Return to the advanced permissions page.
* Select the group by clicking the checkbox next to its name.
* Click Edit User Permissions in the ribbon.
* **Select the Custom Permission Level**
* In the permissions dialog, uncheck any existing permission levels (if applicable).
* Check the box for the custom permission level you want to assign.
* Click OK to save the changes.
* **Verify the Permission Assignment**
* Ensure the group is listed under the correct permission level on the advanced permissions page.
* Test the group's access to confirm the custom permissions are applied correctly.
## Add, change, or remove a site collection administrator
* **Navigate to the SharePoint Site**
* Go to the root site of the site collection where you want to manage the administrators.
* **Open Site Settings**
* Click the gear icon (⚙️) in the top-right corner.
* Select Site Settings from the dropdown menu.
* **Access Site Collection Administrators**
* Under the Users and Permissions section, click Site collection administrators.
* **Add a Site Collection Administrator**
* In the Site Collection Administrators page, enter the name or email address of the person you want to add in the input field.
* Select their name from the suggestions.
* **Change a Site Collection Administrator**
* Replace the name of an existing administrator by removing their entry and adding a new name or email address.
* Ensure at least one administrator remains assigned at all times.
* **Remove a Site Collection Administrator**
* Delete the name of the administrator you want to remove by clearing their entry.
* Confirm that there is at least one remaining administrator before saving.
* **Save Changes**
* Click the OK button to save your changes.
* The updates will take effect immediately.
* **Verify Changes**
* Test the access or permissions of the updated administrator list to ensure everything is functioning correctly.
To view the **site collection administrators** link, you must be a site collection administrator, a SharePoint online admin, or a global admin. This link is not displayed to site owners.
## Create a group
1. **Access the Site Settings**
* Navigate to the SharePoint site where you want to create the group.
* Click the gear icon (⚙️) in the top-right corner and select **[Site settings](/product/the-flowforma-site/site-settings/overview)**.
* If you don't see this option, ensure you have sufficient permissions (site administrator or higher).
2. **Locate the Group Management Page**
* Under Users and Permissions, click Site permissions.
* On the Site Permissions page, click Create Group in the ribbon or on the menu bar.
3. **Set Group Details**
* Name: Enter a name for your group.
* Description: Optionally, provide a brief description of the group's purpose.
4. **Assign Group Ownership**
* Under Group Owner, assign an owner for the group by selecting a user from the directory. This user will have the ability to manage the group.
5. **Configure Group Permissions**
* Choose the group's permission levels, such as Full Control, Contribute, or Read.
* You can create a custom permission level if needed (under Permission Levels in the Site Settings).
6. **Membership Requests (Optional)**
* Decide whether to allow users to request to join or leave the group.
* Configure the settings for auto-approval or manual approval by the group owner.
7. **Add Members to the Group**
* After creating the group, go back to Site permissions and click on the group name.
* Click New (or Add Members) to add users or groups to the new SharePoint group.
8. **Save and Verify**
* Click Create to finalize the group creation.
* Verify the group appears in the Site permissions page and test the permissions if necessary.
Your group is now ready to use! Members added will inherit the permissions associated with the group.
If you want to send emails to a group, set "Everyone" for "Who can view the membership of the group?"
## Remove users from a group
* **Navigate to the Site**
* Go to the SharePoint site where the group is located.
* **Access Site Permissions**
* Click the gear icon (⚙️) in the top-right corner and select Site permissions (or Advanced permissions settings depending on your SharePoint version).
* **Open the Group**
* In the Site Permissions page, locate the group from which you want to remove a user.
* Click the group name to view its membership.
* **Edit Membership**
* On the group's membership page, look for the Settings or Actions menu.
* Select Edit Users or locate the list of members directly.
* **Remove the User**
* Find the user you want to remove from the list of members.
* Select the checkbox next to their name (if applicable), then click Remove Users from Group (or a similar option).
* **Confirm Removal**
* Confirm the action when prompted. The user will be removed from the group.
* **Verify Changes**
* Ensure the user no longer appears in the group membership list.
* Test the user's permissions if necessary to confirm they no longer have access tied to the group.
## Grant site access to a group
* **Navigate to the Site**
* Open the SharePoint site where you want to grant access to a group.
* **Open Site Permissions**
* Click the gear icon (⚙️) in the top-right corner.
* Select Site permissions
* **Grant Permissions**
* On the Site permissions page, click the Grant Permissions button.
* In Advanced permissions settings, you may see an Invite People or Grant Permissions link.
* **Enter the Group Name**
* In the Share or Grant Permissions dialog box, type the name of the SharePoint group you want to give access to.
* Ensure the correct group is selected from the suggestions.
* **Assign Permissions**
* Choose the appropriate permission level for the group, such as Read, Contribute, or Full Control.
* Confirm the level aligns with the group's intended role.
* **Send Notification (Optional)**
* If applicable, choose whether to send an email notification to the group members about the granted access.
* You can include a custom message if needed.
* **Save and Verify**
* Click Share or OK to apply the changes.
* Confirm the group appears in the Site permissions list with the assigned permission level.
## Delete a group
* **Navigate to the Site**
* Go to the SharePoint Online site where the group is located.
* **Access Site Permissions**
* Click the gear icon (⚙️) in the top-right corner.
* Select Site permissions from the dropdown.
* **Open Advanced Permissions**
* In the Site permissions panel, click Advanced permissions settings at the bottom.
* This will open the classic permissions management page.
* **Locate the Group**
* On the advanced permissions page, find the group you want to delete in the list of groups.
* Click the group name to open its settings.
* **Open Group Settings**
* On the group's page, click Settings (located at the top of the page).
* Select Group Settings from the dropdown menu.
* **Delete the Group**
* Scroll to the bottom of the Group Settings page.
* Click Delete and confirm the action when prompted.
* **Verify Deletion**
* Return to the Advanced permissions settings page and confirm the group no longer appears in the list.
## Assign a new permission level to a group
* **Navigate to the Site**
* Go to the SharePoint Online site where the group is located.
* **Access Site Permissions**
* Click the gear icon (⚙️) in the top-right corner.
* Select Site permissions from the dropdown.
* **Open Advanced Permissions**
* In the Site permissions panel, click Advanced permissions settings at the bottom.
* This will open the classic permissions management page.
* **Create or Verify a Custom Permission Level**
* On the advanced permissions page, click Permission Levels at the top.
* If the required custom permission level doesn't exist, click Add a Permission Level.
* Provide a name and description, select the desired permissions, and click Create.
* **Assign the Custom Permission Level to a Group**
* Return to the advanced permissions page.
* Select the group by clicking the checkbox next to its name.
* Click Edit User Permissions in the ribbon.
* **Select the Custom Permission Level**
* In the permissions dialog, uncheck any existing permission levels (if applicable).
* Check the box for the custom permission level you want to assign.
* Click OK to save the changes.
* **Verify the Permission Assignment**
* Ensure the group is listed under the correct permission level on the advanced permissions page.
* Test the group's access to confirm the custom permissions are applied correctly.
## Add, change, or remove a site collection administrator
* **Navigate to the SharePoint Site**
* Go to the root site of the site collection where you want to manage the administrators.
* **Open Site Settings**
* Click the gear icon (⚙️) in the top-right corner.
* Select Site Settings from the dropdown menu.
* **Access Site Collection Administrators**
* Under the Users and Permissions section, click Site collection administrators.
* **Add a Site Collection Administrator**
* In the Site Collection Administrators page, enter the name or email address of the person you want to add in the input field.
* Select their name from the suggestions.
* **Change a Site Collection Administrator**
* Replace the name of an existing administrator by removing their entry and adding a new name or email address.
* Ensure at least one administrator remains assigned at all times.
* **Remove a Site Collection Administrator**
* Delete the name of the administrator you want to remove by clearing their entry.
* Confirm that there is at least one remaining administrator before saving.
* **Save Changes**
* Click the OK button to save your changes.
* The updates will take effect immediately.
* **Verify Changes**
* Test the access or permissions of the updated administrator list to ensure everything is functioning correctly.
To view the **site collection administrators** link, you must be a site collection administrator, a SharePoint online admin, or a global admin. This link is not displayed to site owners.