> ## Documentation Index
> Fetch the complete documentation index at: https://docs.flowforma.com/llms.txt
> Use this file to discover all available pages before exploring further.
# FlowForma Connect
> Export and import data between a FlowForma form and other systems using a business rule that calls an Azure Logic App, mapping questions to request and output properties.
**FlowForma Connect** allows you to export data from a **FlowForma** form to other systems, and import data from other systems into a **FlowForma** form, using the Azure Logic App feature.
The feature comprises a business rule that interacts with the Azure Logic App to simplify the creation of the Logic App.
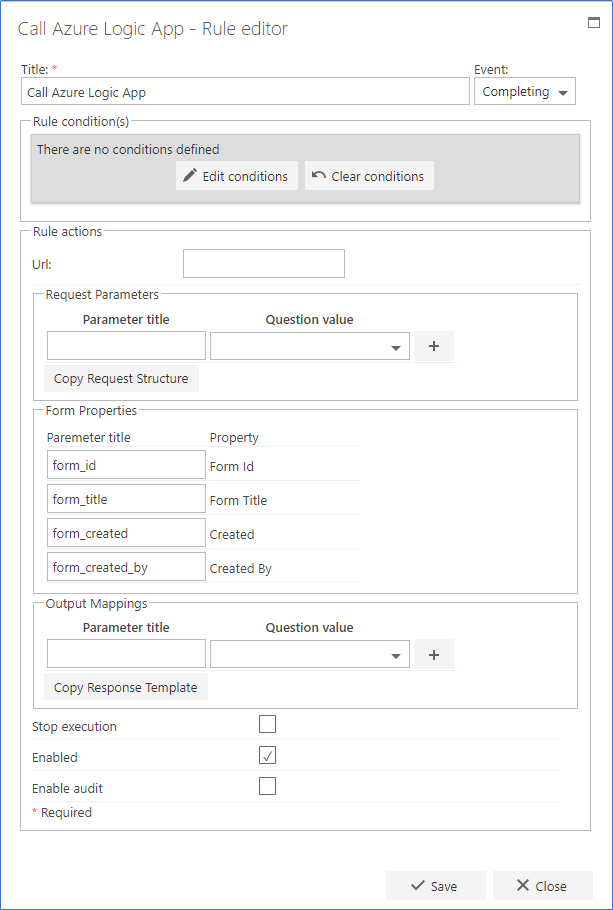 ## Title
The first part of the business rule lets you define a **title** for your rule and select the event on which it operates. The default title is the standard **FlowForma** rule name; change it by deleting the text and entering your own.
In the **event** field you determine when the rule is executed. For a flow this can occur when the form is loaded, started, or completed. For a step this can occur when the step is started, saved, or completed. For questions it can occur when the question is updated.
## Rule condition(s)
The second part of the business rule lets you set conditions. These are not required, but if entered they control when the rule is executed in relation to other items in the form.
## Rule actions
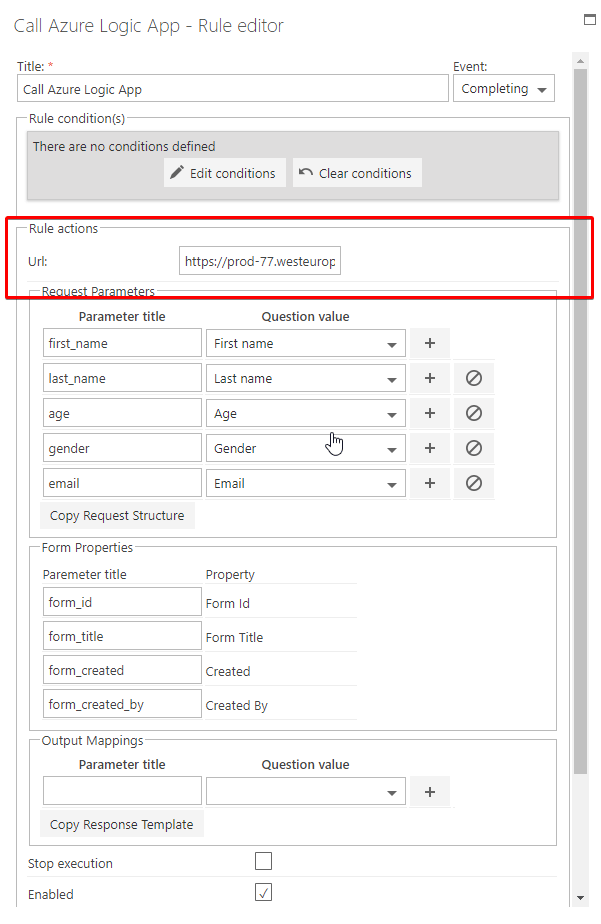
**Url**: This is the Url of the Azure Logic App that is called by the business rule. Copy it from the Logic App.
**Request parameters**: To export data from a **FlowForma** form to a Logic App, map the **FlowForma** form questions to Logic App properties. Create these properties and mappings here, then use the button provided to copy the properties so you can paste them into the Logic App.
**Form properties**: Standard properties for each form are passed to the Logic App: the **FlowForma** form Form Id, Form title, the date the form was created, and the user who created the form. These are exported to the Logic App automatically when the rule executes.
**Output mappings**: When the Logic App executes, you can receive data back from it into the **FlowForma** form. To do this, create mappings between the **FlowForma** form question and the Logic App property. Create these properties and mappings here, then use the button provided to copy the properties so you can paste them into the Logic App.
**Stop execution**: If enabled, no other rules run after this rule executes.
**Enabled**: As rules are not saved to a list like questions and steps are, toggle this option to enable or disable a rule without having to delete it.
**Enable audit**: If checked, a record will be added to the audit trail when this rule is executed. This option is available when the Compliance feature pack is activated.
Transferring data using **FlowForma Connect** requires updating a **FlowForma** flow and an Azure Logic App at the same time.
Below are the steps required to create the business rule in the FlowForma flow and create the Logic App.
## Step 1. Create business rule in the FlowForma form
Once you have created the questions that will be used to send data to the Logic App or receive data from the Logic App, add a **Call Azure Logic App** business rule.
## Step 2. Create the Logic App
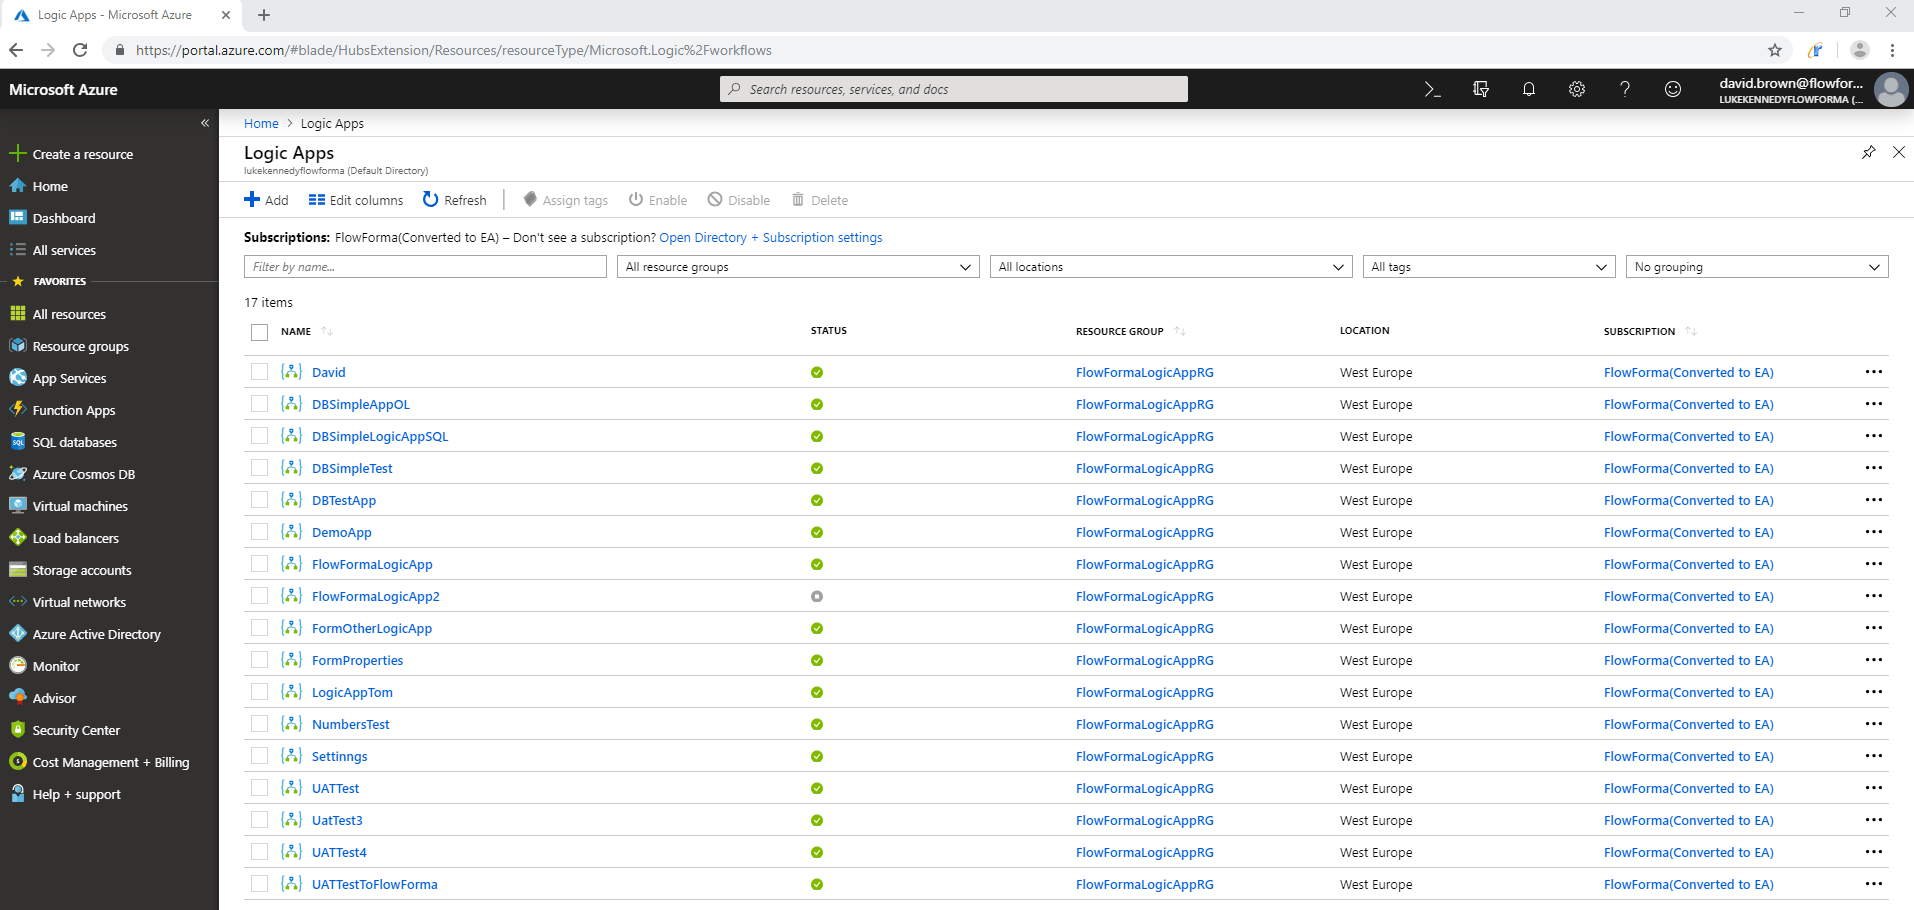
Go to the Azure portal: [https://portal.azure.com/#blade/HubsExtension/Resources/resourceType/Microsoft.Logic%2Fworkflows](https://portal.azure.com/#blade/HubsExtension/Resources/resourceType/Microsoft.Logic%2Fworkflows)
The following screen will be displayed.
## Title
The first part of the business rule lets you define a **title** for your rule and select the event on which it operates. The default title is the standard **FlowForma** rule name; change it by deleting the text and entering your own.
In the **event** field you determine when the rule is executed. For a flow this can occur when the form is loaded, started, or completed. For a step this can occur when the step is started, saved, or completed. For questions it can occur when the question is updated.
## Rule condition(s)
The second part of the business rule lets you set conditions. These are not required, but if entered they control when the rule is executed in relation to other items in the form.
## Rule actions
**Url**: This is the Url of the Azure Logic App that is called by the business rule. Copy it from the Logic App.
**Request parameters**: To export data from a **FlowForma** form to a Logic App, map the **FlowForma** form questions to Logic App properties. Create these properties and mappings here, then use the button provided to copy the properties so you can paste them into the Logic App.
**Form properties**: Standard properties for each form are passed to the Logic App: the **FlowForma** form Form Id, Form title, the date the form was created, and the user who created the form. These are exported to the Logic App automatically when the rule executes.
**Output mappings**: When the Logic App executes, you can receive data back from it into the **FlowForma** form. To do this, create mappings between the **FlowForma** form question and the Logic App property. Create these properties and mappings here, then use the button provided to copy the properties so you can paste them into the Logic App.
**Stop execution**: If enabled, no other rules run after this rule executes.
**Enabled**: As rules are not saved to a list like questions and steps are, toggle this option to enable or disable a rule without having to delete it.
**Enable audit**: If checked, a record will be added to the audit trail when this rule is executed. This option is available when the Compliance feature pack is activated.
Transferring data using **FlowForma Connect** requires updating a **FlowForma** flow and an Azure Logic App at the same time.
Below are the steps required to create the business rule in the FlowForma flow and create the Logic App.
## Step 1. Create business rule in the FlowForma form
Once you have created the questions that will be used to send data to the Logic App or receive data from the Logic App, add a **Call Azure Logic App** business rule.
## Step 2. Create the Logic App
Go to the Azure portal: [https://portal.azure.com/#blade/HubsExtension/Resources/resourceType/Microsoft.Logic%2Fworkflows](https://portal.azure.com/#blade/HubsExtension/Resources/resourceType/Microsoft.Logic%2Fworkflows)
The following screen will be displayed.
 Click
Click  to create a new Logic App. The screen below is displayed.
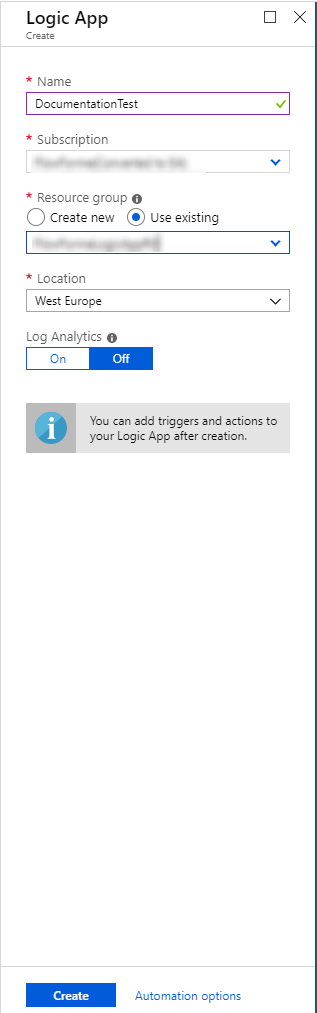
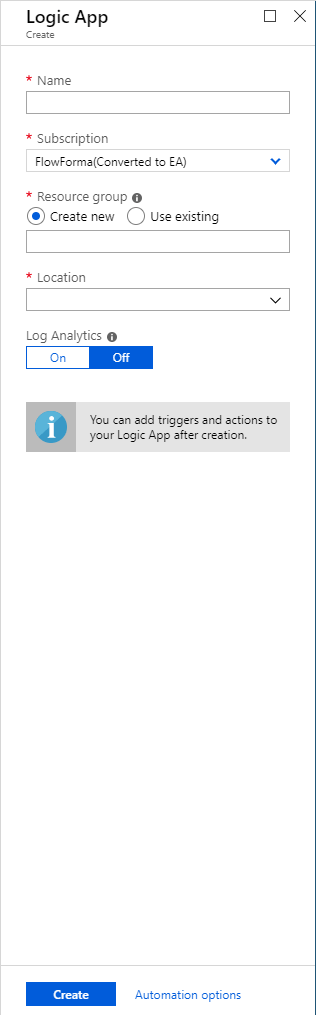 **Name**: Enter a name for your Logic App.
**Subscription**: This will be populated by your current subscription.
**Resource group**: Select existing.
**Location**: This will be populated when you have selected a Resource group.
**Log Analytics**: Leave Off.
**Name**: Enter a name for your Logic App.
**Subscription**: This will be populated by your current subscription.
**Resource group**: Select existing.
**Location**: This will be populated when you have selected a Resource group.
**Log Analytics**: Leave Off.
 When you have entered or selected all the fields, click
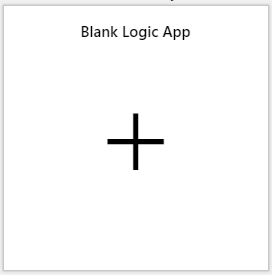
  You now need to select which type of Logic App you want to create.
Select **Blank Logic App**.
You now need to select which type of Logic App you want to create.
Select **Blank Logic App**.
 The following screen is displayed.
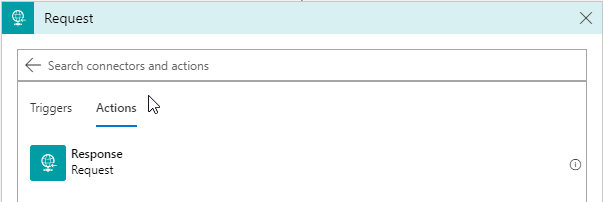
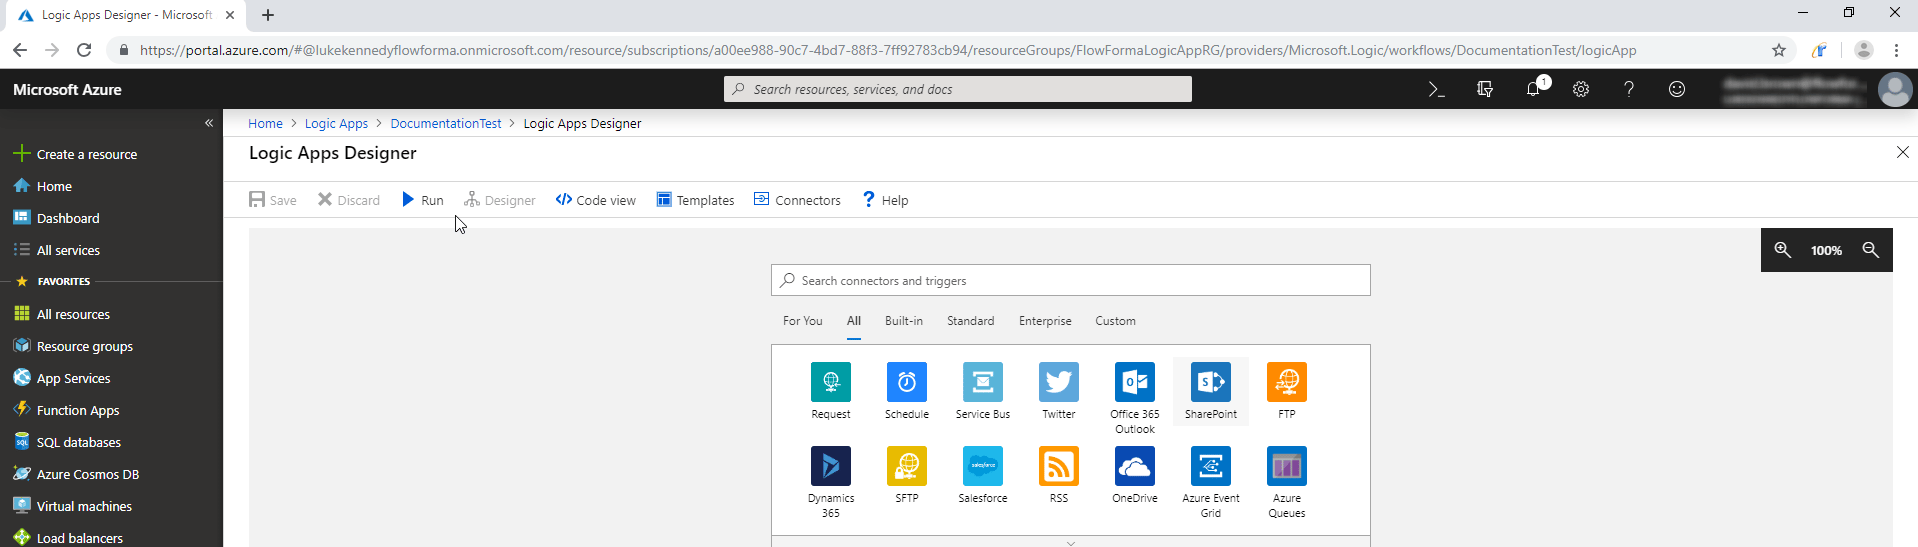 Select **Request**. This is the first section on the Logic App, where data is received from the FlowForma form.
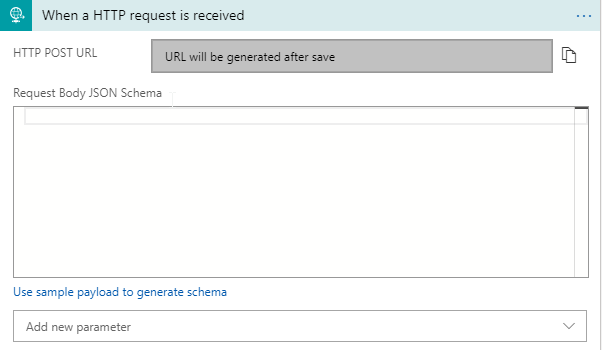 Click
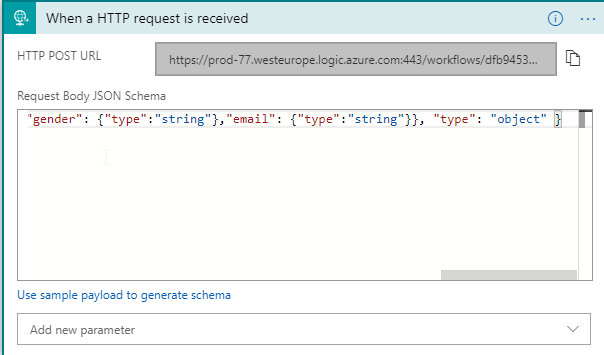
Click  The Logic App has now been saved, and a Url for the Logic App generated. Click the
  symbol next to the HTTP Post URL to copy the Url.
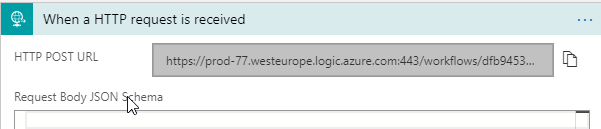 Copy this Url into the business rule on your FlowForma flow.
 ## Step 3. Create request parameters (Questions used to send data to the Logic App)
In the request parameters section, open the **Question value** dropdown and you will see all the questions contained in the FlowForma flow.
Select the question you require, and a parameter title is created using this question name.
## Step 3. Create request parameters (Questions used to send data to the Logic App)
In the request parameters section, open the **Question value** dropdown and you will see all the questions contained in the FlowForma flow.
Select the question you require, and a parameter title is created using this question name.
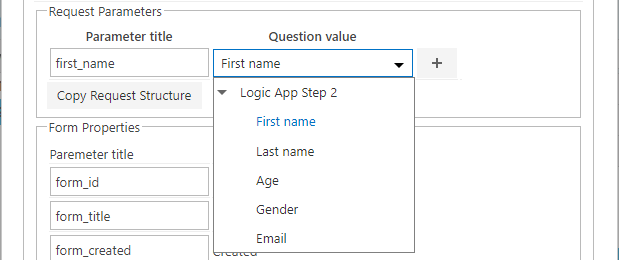 Repeat this process for all the questions that are to be used to send data to the Logic App.
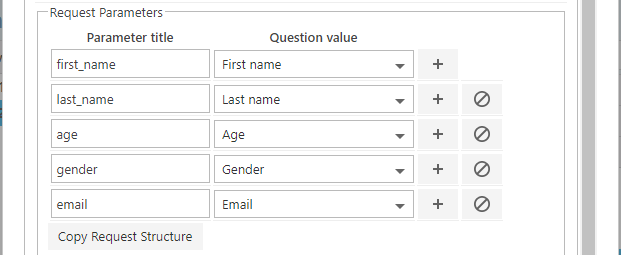 Below the parameters is a button
  , which copies the request structure to your clipboard so you can paste it into the Logic App using Ctrl+V.
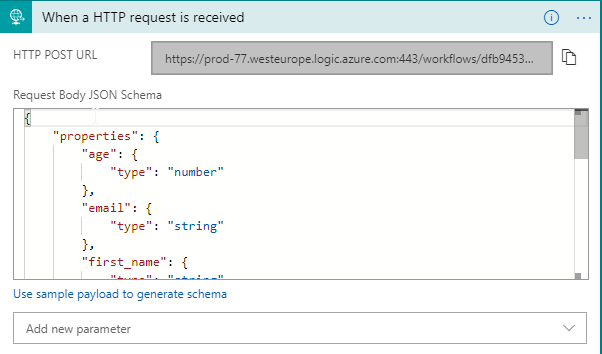
Click the button and return to your Logic App, paste it into the Request body JSON Schema field, and press Ctrl+Y.
, which copies the request structure to your clipboard so you can paste it into the Logic App using Ctrl+V.
Click the button and return to your Logic App, paste it into the Request body JSON Schema field, and press Ctrl+Y.
 The properties have now been added to the Logic App. Close the Logic App and reopen it to see the formatted version.
 At this point, the data has been received by the Logic App, and you now decide what you want to do with it.
In this example, we insert a row in a SQL database table.
In the Logic App, click
At this point, the data has been received by the Logic App, and you now decide what you want to do with it.
In this example, we insert a row in a SQL database table.
In the Logic App, click  Search for the action you require, in this case SQL server.
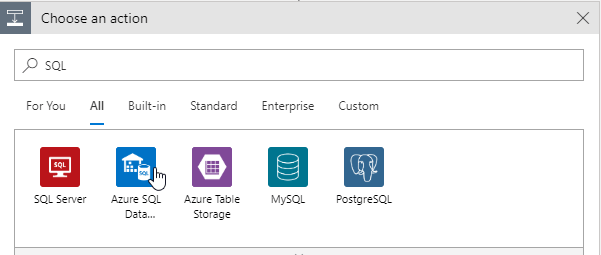 When you click on SQL server, it will list the options available.
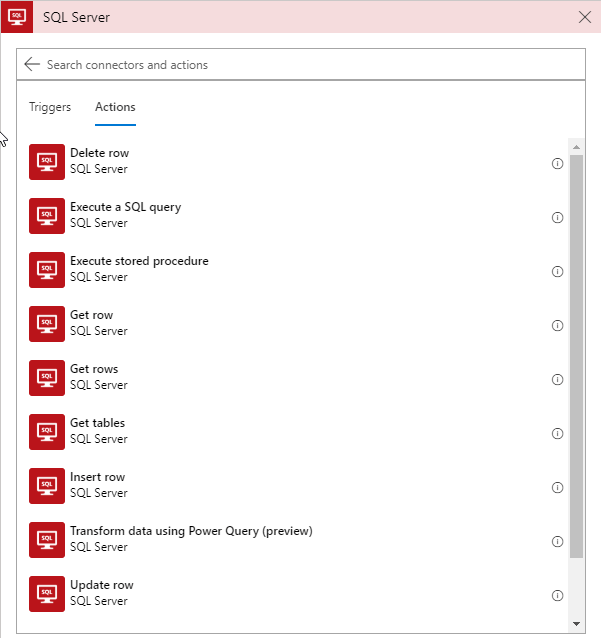 In this example we will select **Insert row**.
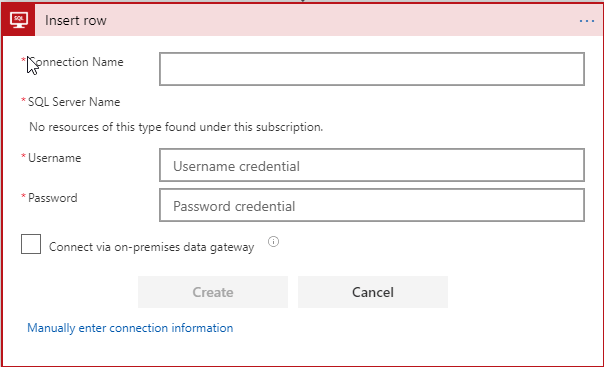
You will need to enter the Server Url and credentials to update the database.
In this example we will select **Insert row**.
You will need to enter the Server Url and credentials to update the database.
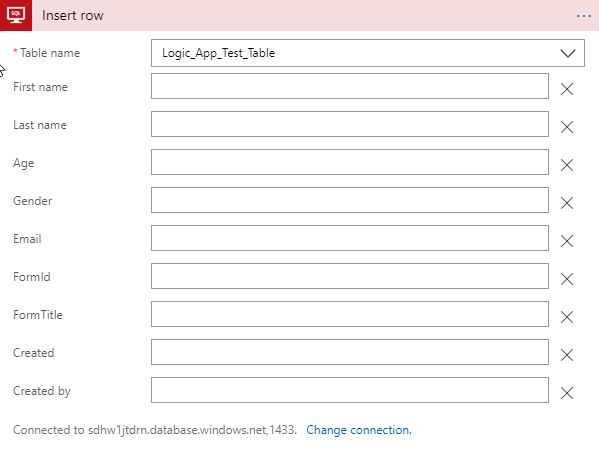
 You are then asked to select a table to update.
Select a table from the database.
All the columns in the table are now shown as parameters.
You are then asked to select a table to update.
Select a table from the database.
All the columns in the table are now shown as parameters.
 If you click in a textbox next to a parameter, you can add dynamic content.
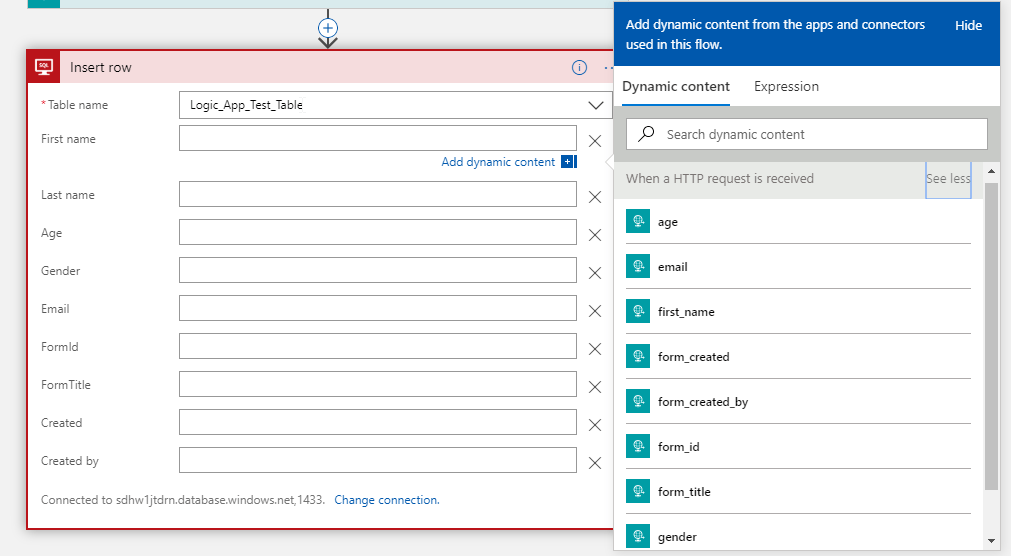 The dynamic content includes properties defined in the request parameters, so it picks up form items.
Click in the Parameter textbox, then click the property required.
The dynamic content includes properties defined in the request parameters, so it picks up form items.
Click in the Parameter textbox, then click the property required.
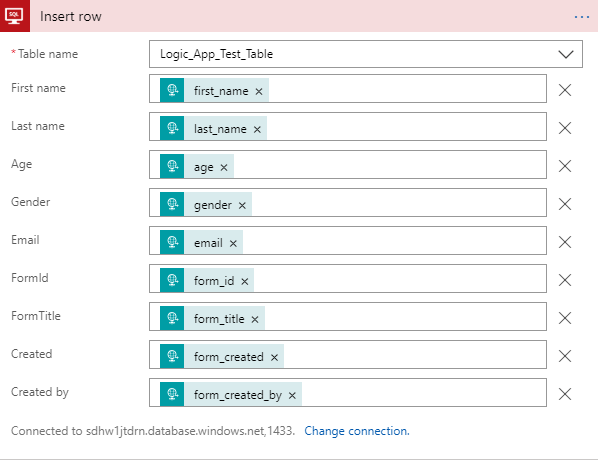 Now, when the rule executes in the FlowForma form, a row is inserted in the database.
You can leave the flow and Logic App at this stage, or you may want to receive notification in the form that the database has been updated.
To do this, create an output mapping in the business rule.
Now, when the rule executes in the FlowForma form, a row is inserted in the database.
You can leave the flow and Logic App at this stage, or you may want to receive notification in the form that the database has been updated.
To do this, create an output mapping in the business rule.
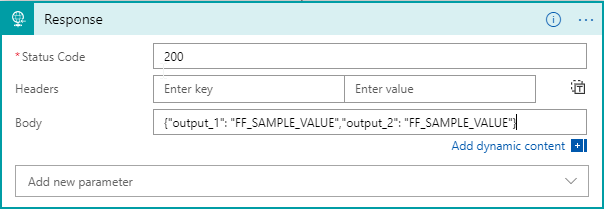
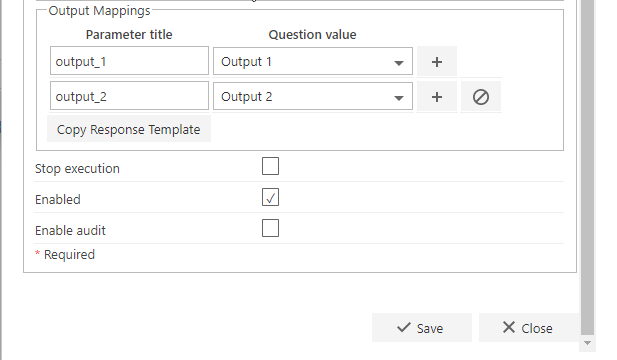 This is the same process used when creating request parameters. When you select a question value, a Logic App parameter is created.
After you have created all the output mappings required, click the
This is the same process used when creating request parameters. When you select a question value, a Logic App parameter is created.
After you have created all the output mappings required, click the  button to add the response structure to your clipboard.
Go back to your Logic App and click
button to add the response structure to your clipboard.
Go back to your Logic App and click  Select the action you require, in this case **HTTP response**.
 Click it and the editor opens.
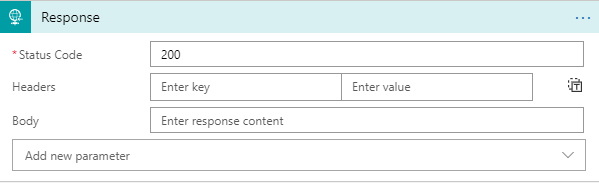 Copy the Response structure from above into the body section.