> ## Documentation Index
> Fetch the complete documentation index at: https://docs.flowforma.com/llms.txt
> Use this file to discover all available pages before exploring further.
# Step settings
> Configure step settings in FlowForma to set titles, assignments, view permissions, attachments, passback, delegation, and eSignature options.
For each step, you can access the **step settings** to specify additional settings for the step.
Select the relevant step and then click the **step settings** cog. The editor below is then displayed.
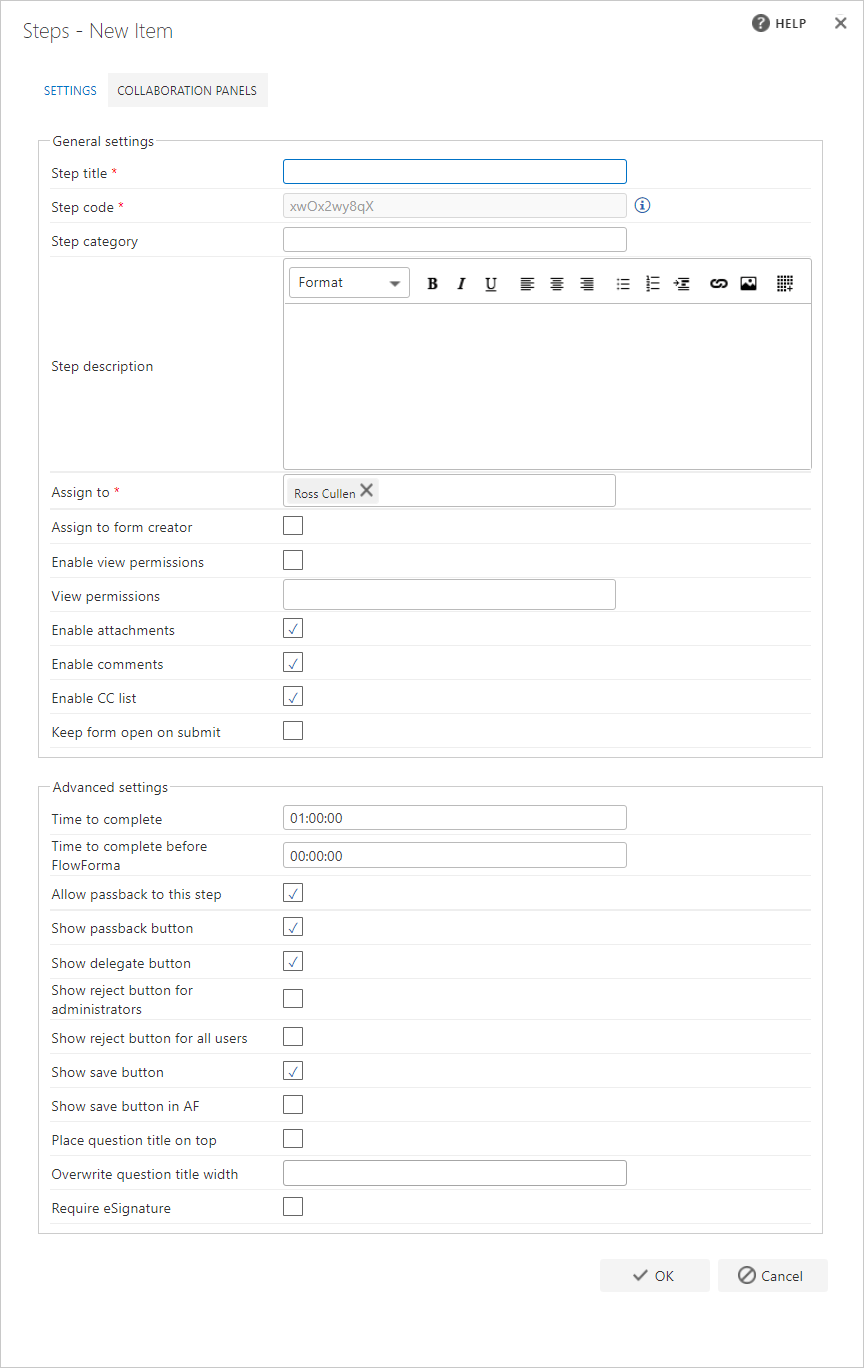 ## General settings
**Step title**: each step must have a title. This is the text that appears on the tile for the step when a form is executed\
**Step code**: step codes are used as unique identifiers for steps. It's recommended to use the system-generated step codes and not change them unless you have a good reason and know what you're doing, as changing them can have adverse effects\
**Step category**: you can categorize your steps, for example creating a category for all "finance" related steps, or "approval" steps\
**Step description**: you can enter a description of the step for further clarification. When a form is created, this description is displayed at the foot of the step, so it can be used to display information relating to the step. When you enter the step description, a formatting panel appears at the top of the screen, which you can use to control the format of the text when it's presented to the user in the form\
**Assign to**: you can assign an individual or a group to a step. Those assigned to a step are able to complete, reject or approve the step\
**Assign to form creator**: rather than specify who the step is assigned to, you can assign it to the person who initiates (creates) the form\
**Enable view permissions**: if you check this option, view permissions are enabled\
**View permissions**: specify the users or groups you want to grant view permission to. Only users or groups that already exist can be selected. Once you start typing, suggested names appear. Only these users/groups are able to view the information entered in this step\
**Enable attachments**: check this option to include an attachments section in the step, a section at the foot of the step where you can attach documents\
**Enable comments**: check this option to include a comments section in the step, a section at the foot of the form where you can enter comments if required\
**Enable CC list**: check this option to include a CC list section in the step, this section allows you to enter users/groups or email addresses to be added to the CC list of automated emails when the step is submitted\
**Keep form open on submit**: enabling this option keeps the form open when a user submits this step, instead of automatically closing the dialogue
## Advanced settings
**Time to complete**: in order to provide reporting, **FlowForma** captures information about the length of time it takes to complete steps. The time is displayed as "days":"hours":"minutes", and is set to 1 day by default, but you can change this. When you place the mouse in the relevant field, the number value appears. Type in the new day/hour/minute value you want to use\
**Time to complete before FlowForma**: this option can be used to state how long this step took before the process was implemented in FlowForma, so it can be compared to see time savings after introducing FlowForma\
**Allow passback to this step**: the passback option allows a user to pass a request back to a previous step. This could be any prior step in the flow, but if you don't want a form passed back to this step, check this box\
**Show passback button**: each step displays buttons to allow you to perform a particular action. By default the passback button is displayed, allowing the user of a step to perform a passback to a previous step in the form. If you don't want the user to perform a passback, you can hide the passback button by unchecking this option, and the passback button will not be displayed on the step\
**Show delegate button**: each step displays buttons to allow you to perform a particular action. By default the delegate button is displayed, allowing the user of a step to re-assign the step in the form to another user/group for completion. If you don't want to allow the user to delegate the step, you can hide the delegate button by unchecking this option, and the delegate button will not be displayed on the step\
**Show delegate button for all users**: you can allow the delegate button to be used by all users by enabling this option\
**Show reject button for administrators**: rejecting a form ends the progress of the form at the step where the rejection is performed. Information entered in steps completed prior to rejection is retained, but no further steps can be completed. On the forms list, the status of the form is displayed as "Rejected", or the alternative text you have selected in your [Flow settings](/product/creating-flows/flow/flow-settings). By default the reject button is not displayed on a step, meaning the form cannot be rejected. The ability to reject forms is limited to **FlowForma administrators** and **Flow administrators**. If you want users with these permissions to be able to reject the form on this step in the flow, you must check this checkbox to display the reject button on the step\
**Show reject button for form author**: you can allow the reject button to be used by the form author by enabling this option\
**Show reject button for all users**: you can allow the reject button to be used by all users by enabling this option\
**Show save button**: this option sets whether the save form button is displayed on the step\
**Show save button in AF**: this option sets whether the save form button is displayed on the step when the step is an Engage form\
**Place question title on top**: this option sets all question titles on this step above the question answer field in the form\
**Title alignment**: this option lets you configure the alignment of question titles on the step\
**Overwrite question title width**: by default, a form has a two-column layout where the first column is used for question labels and the second column is used for question answers. The width of the first column is 155px, but you can change that by entering a different value. This setting only applies to the step you're applying the new setting to\
**Question input width**: this option lets you set the width of the question input/answer column on the step\
**Require eSignature**: you can decide that an eSignature is required to allow you to submit this step by checking this option\
**Type of eSignature**: when eSignature is required, choose whether the step uses a **21 CFR** or **Standard** eSignature
## Collaboration panels
The collaboration panels are part of the **Collaborative decision making** features.
The collaboration panels include four items that can be displayed on forms.
## General settings
**Step title**: each step must have a title. This is the text that appears on the tile for the step when a form is executed\
**Step code**: step codes are used as unique identifiers for steps. It's recommended to use the system-generated step codes and not change them unless you have a good reason and know what you're doing, as changing them can have adverse effects\
**Step category**: you can categorize your steps, for example creating a category for all "finance" related steps, or "approval" steps\
**Step description**: you can enter a description of the step for further clarification. When a form is created, this description is displayed at the foot of the step, so it can be used to display information relating to the step. When you enter the step description, a formatting panel appears at the top of the screen, which you can use to control the format of the text when it's presented to the user in the form\
**Assign to**: you can assign an individual or a group to a step. Those assigned to a step are able to complete, reject or approve the step\
**Assign to form creator**: rather than specify who the step is assigned to, you can assign it to the person who initiates (creates) the form\
**Enable view permissions**: if you check this option, view permissions are enabled\
**View permissions**: specify the users or groups you want to grant view permission to. Only users or groups that already exist can be selected. Once you start typing, suggested names appear. Only these users/groups are able to view the information entered in this step\
**Enable attachments**: check this option to include an attachments section in the step, a section at the foot of the step where you can attach documents\
**Enable comments**: check this option to include a comments section in the step, a section at the foot of the form where you can enter comments if required\
**Enable CC list**: check this option to include a CC list section in the step, this section allows you to enter users/groups or email addresses to be added to the CC list of automated emails when the step is submitted\
**Keep form open on submit**: enabling this option keeps the form open when a user submits this step, instead of automatically closing the dialogue
## Advanced settings
**Time to complete**: in order to provide reporting, **FlowForma** captures information about the length of time it takes to complete steps. The time is displayed as "days":"hours":"minutes", and is set to 1 day by default, but you can change this. When you place the mouse in the relevant field, the number value appears. Type in the new day/hour/minute value you want to use\
**Time to complete before FlowForma**: this option can be used to state how long this step took before the process was implemented in FlowForma, so it can be compared to see time savings after introducing FlowForma\
**Allow passback to this step**: the passback option allows a user to pass a request back to a previous step. This could be any prior step in the flow, but if you don't want a form passed back to this step, check this box\
**Show passback button**: each step displays buttons to allow you to perform a particular action. By default the passback button is displayed, allowing the user of a step to perform a passback to a previous step in the form. If you don't want the user to perform a passback, you can hide the passback button by unchecking this option, and the passback button will not be displayed on the step\
**Show delegate button**: each step displays buttons to allow you to perform a particular action. By default the delegate button is displayed, allowing the user of a step to re-assign the step in the form to another user/group for completion. If you don't want to allow the user to delegate the step, you can hide the delegate button by unchecking this option, and the delegate button will not be displayed on the step\
**Show delegate button for all users**: you can allow the delegate button to be used by all users by enabling this option\
**Show reject button for administrators**: rejecting a form ends the progress of the form at the step where the rejection is performed. Information entered in steps completed prior to rejection is retained, but no further steps can be completed. On the forms list, the status of the form is displayed as "Rejected", or the alternative text you have selected in your [Flow settings](/product/creating-flows/flow/flow-settings). By default the reject button is not displayed on a step, meaning the form cannot be rejected. The ability to reject forms is limited to **FlowForma administrators** and **Flow administrators**. If you want users with these permissions to be able to reject the form on this step in the flow, you must check this checkbox to display the reject button on the step\
**Show reject button for form author**: you can allow the reject button to be used by the form author by enabling this option\
**Show reject button for all users**: you can allow the reject button to be used by all users by enabling this option\
**Show save button**: this option sets whether the save form button is displayed on the step\
**Show save button in AF**: this option sets whether the save form button is displayed on the step when the step is an Engage form\
**Place question title on top**: this option sets all question titles on this step above the question answer field in the form\
**Title alignment**: this option lets you configure the alignment of question titles on the step\
**Overwrite question title width**: by default, a form has a two-column layout where the first column is used for question labels and the second column is used for question answers. The width of the first column is 155px, but you can change that by entering a different value. This setting only applies to the step you're applying the new setting to\
**Question input width**: this option lets you set the width of the question input/answer column on the step\
**Require eSignature**: you can decide that an eSignature is required to allow you to submit this step by checking this option\
**Type of eSignature**: when eSignature is required, choose whether the step uses a **21 CFR** or **Standard** eSignature
## Collaboration panels
The collaboration panels are part of the **Collaborative decision making** features.
The collaboration panels include four items that can be displayed on forms.
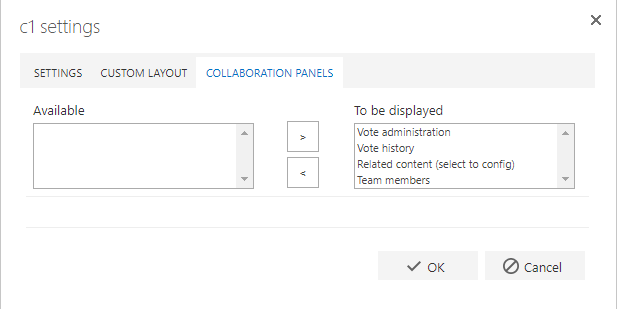 **Vote administration**: this panel is only displayed where there is a voting question included on the step. It allows the vote owner to administer the vote\
**Vote history**: this panel is only displayed where there is a voting question on the step. It shows the progress of the vote to date, giving details of whether voters have voted, and when votes were cast\
**Related content (select to config)**: can be added to any step and allows access to files/documents contained in the folder defined in the configuration
You need to click on the "Related content (select to config)" item to open the folder selector. You can then select the folder from which related content documents will be retrieved.
When a form is created, a **Related content** section is displayed on the right of the form. This section can be expanded to show any documents in the folder selected in the configuration.
**Team members**: this panel is only displayed where there is a voting question on the step. When expanded, it shows all users that have been selected to take part in the vote
**Vote administration**: this panel is only displayed where there is a voting question included on the step. It allows the vote owner to administer the vote\
**Vote history**: this panel is only displayed where there is a voting question on the step. It shows the progress of the vote to date, giving details of whether voters have voted, and when votes were cast\
**Related content (select to config)**: can be added to any step and allows access to files/documents contained in the folder defined in the configuration
You need to click on the "Related content (select to config)" item to open the folder selector. You can then select the folder from which related content documents will be retrieved.
When a form is created, a **Related content** section is displayed on the right of the form. This section can be expanded to show any documents in the folder selected in the configuration.
**Team members**: this panel is only displayed where there is a voting question on the step. When expanded, it shows all users that have been selected to take part in the vote